
You can create your own custom shapes by using the rectangle, ellipse, arc, freeform, and pencil shapes in Visio.

If you want to be able to utilise fill colors to your new shape, you lot need to create a closed shape. If you utilize the Rectangle tool or the Ellipse tool, you become closed shapes automatically. Past default, closed shapes are filled with a solid color.
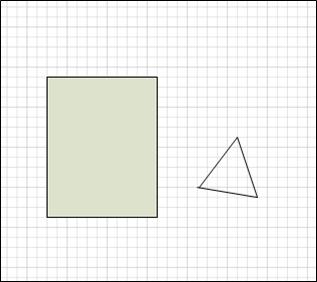
In this example, the rectangle is a closed shape considering it is filled with a solid color. You can tell that the triangle is not closed because it is not filled with a solid color and you can see the cartoon background through the shape.
What do you desire to practise?
-
Draw a rectangle or circle
-
Draw a custom shape
-
Edit a shape
-
Create a new master shape
Draw a rectangle or circle
-
On the Domicile tab, in the Tools group, click the arrow next to Rectangle
 , and and so do 1 of the following:
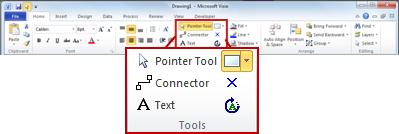
-
To depict a rectangle, select the Rectangle tool.
-
To describe a circle or oval, select the Ellipse tool.
-
-
Drag to draw the shape on the drawing folio.
-
To return to regular editing, in the Tools group, click the Arrow
 tool.
tool.
Pinnacle of Page
Draw a custom shape
-
On the Domicile tab, in the Tools group, click the pointer side by side to Rectangle
, and and so do ane of the post-obit: -
To draw a direct line, select the Line tool.
-
To depict an irregular shape, select the Freeform tool.
-
To draw a curved line, select the Arc tool.
-
-
To describe the start segment, point to where you want to start the shape, and so drag until the segment is the size that you want.
-
Subsequently you draw the segment, the shape displays vertices
 .
.
-
-
To draw the second segment, betoken to the vertex of the first segment, and then drag.
-
To draw additional segments, signal to the vertex at the end of the concluding segment that you added, and then drag to depict the next segment.
Note:To undo a segment, press Ctrl+Z. Segments are deleted in the reverse society in which they were drawn.
-
To close the shape, drag the endpoint of the last segment that yous create over the vertex at the beginning of the first segment. The shape becomes opaque, which indicates that it is a airtight shape.
-
To return to regular editing, on the Home tab, in the Tools group, click the Pointer tool
.
Acme of Page
Edit a shape
You tin edit most shapes in Visio by adding, deleting, and reshaping segments in the shape.
Delete a segment from a shape
-
On the Dwelling tab, in the Tools group, click the arrow next to Rectangle
, then click the Pencil tool  .
. -
Select the shape that you want to delete a segment from, click the vertex
that you want to delete, and then press DELETE.
Add a segment to a shape
-
On the Home tab, in the Tools group, click the arrow side by side to Rectangle
, and then click the Pencil tool . -
Select the shape the shape that you want to add a segment to, point to where you desire to add the segment, and concord downward the Ctrl central so click.
A new vertex appears where you clicked the shape, creating a new segment.
Reshape a shape
-
On the Home tab, in the Tools group, click the pointer next to Rectangle
, and then click the Pencil tool . -
Select the shape, click the vertex
that you lot want to motility, and and then drag the vertex to a new position.
Top of Folio
Create a new principal shape
Yous tin reuse your custom shape in other drawings past making it a master shape. To plow a custom shape into a master shape, do the following?
-
In the Shapes pane, click More Shapes, and then select a custom stencil or create a new custom stencil by selecting New Stencil (U.s.a. units) or New Stencil (Metric).
-
On the drawing page, select your custom shape and drag it into the new stencil in the Shapes pane.
-
To rename your new chief shape, correct-click the shape, select Rename Master, and and so blazon a name for the new main shape.
-
In the Shapes pane, on the custom stencil, click Relieve to salvage the changes to the custom stencil with the new master shape.
For more information about how to create a new master shape, see Create a shape or Edit a master shape.
Top of Page
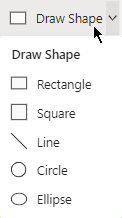
You lot tin can describe custom-sized shapes straight on the canvas by using the rectangle, square, line, circle, and ellipse options on theDraw Shape menu on the Insert (or Abode) tab of the toolbar ribbon:

-
With a cartoon open in Visio for the web, select the Insert tab of the ribbon.
-
Select Depict Shape, then select the shape you desire to draw.
-
On the canvas, click and drag to draw the shape.
The shape is drawn at that position in the size your specify.
-
Continue to modify the shape every bit needed. You tin can alter the color, add text to it, and and so on.
See As well
Add text to a shape
Format a shape
DOWNLOAD HERE
How to Draw a Curved Line in Visio TUTORIAL
Posted by: jasonpardslia.blogspot.com
Komentar
Posting Komentar